Thursday, March 10, 2011

Niner Steps Up (Again)

Regarding the frame crack from last week, after contacting my trusted mechanic, he contacted Niner about my issue. Since there wasn't a Niner dealer in the immediate area, Niner called me directly to handle the warranty return. They paid shipping to and from the Niner shop. The Niner rep was very nice about the problem and the shipping was fast. Total turn-around time was 13 days from the time the old rear triangle left my house (on the East coast) to the time I received the replacement triangle (back from Niner on the West coast).


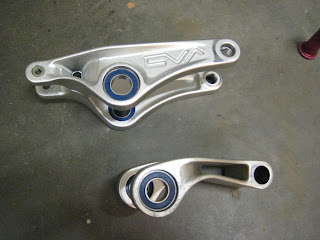
Since I do most of my own bike maintenance, I dismantled the RIP 9 myself, boxed up the broken frame part and shipped it out. I ordered new bearings for the pivots while I was at it. When I received the replacement parts, I made a jig in the wood shop to remove the old bearings from the linkages and installed the new ones.


Then re-assembled the bike. It's ready to ride once again - complete with fresh bearings. The rear suspension activates super smoothly, thanks to the new bearings.


So here's a huge Shout Out to Niner for once again standing behind their products.

Tuesday, March 8, 2011

New Bike Transporter

For the last seven years, I have been hauling my bikes, family, trail maintenance tools, and lumber around in my Toyota mini-van. When the load was too much for the van, I added an AirLift 1000 kit by AirLift to the suspension to help resist suspension sag. When the air bag sprung a leak, I purchased custom coils for the rear shocks. When space got tight, I hauled a trailer to add more room.


The van was starting to show its age and getting a little worse for wear due to pulling the heavy trailer up and down mountains the last two summers. It was time for a new vehicle. This time, I had one primary criteria - the vehicle had to pass the 4x8 plywood test. This ruled out 90% of the vehicles on the market. My final list consisted of the Ford F-150 SuperCrew, Toyota Sienna and Honda Odyssey. After all the suspension mods in the last van, I decided it was time for a truck. Introducing my new ride for the next 60 months:


I learned a few things from my purchase experience and I thought I'd share them here.


  1. Buy on the last day of the month - dealers are hungry for a sale to increase their monthly totals (Ford even gave more incentives for Monday, Feb 28th - the day I bought my truck).

  2. Selling your old car yourself does give you the most money for your vehicle, but that can be time consuming and, honestly, a pain in the a$$ sometimes. Trade-ins do help the bargaining process because it gives the dealer some wiggle room when it comes time to compute final numbers. Know ahead of time time the Kelly Blue Book and Edmunds value of your car. The more you know when you walk in the dealership, the better.

  3. Know how much you want your monthly payment to be. Tell them what you are going to put down in cash and then say, "if you can make these numbers work, I'll buy the car". That's what saved me. I told them I want my payments at $XYZ per month and they went off and made the numbers work. They took a little off the price of the truck (under invoice) and jacked up the price of my trade in. Final offer from them was exactly what I told them I wanted it to be. To be honest, I was quite aggressive with my request, but I was also ready to walk out and shop again another day. It was the afternoon of the last day of a slow selling month. They worked hard to meet my numbers.

  4. There's a 3% sales tax in my state, so include that in your budget.

  5. Know ahead of time if you want:
    • extended maintenance plan (~$1000)

    • extended bumper-to-bumper warranty (~$1000)

    • GAP insurance (~$400)


    The finance guy will drive a hard sell to include those packages. If you finance these, your final monthly payment will change.

  6. Pay $8 for your Equifax credit score before you start shopping. That will tell you whether you'll qualify for the good rates (like 0% financing or other financing deals).

  7. Look at BankRate.com to find out what the going rates for auto loans are. Recently, no one has been able to come close to BankOfAmerica online. I called them and got pre-approved for a very good rate. In the back room of the dealership, the finance guy was able to beat that by 0.2%, but it gave me a starting point for calculating my monthly costs before I started haggling with the dealer.

  8. Bonus tip - I downloaded a few "car loan" and "simple loan" apps on my Android Smartphone. When the dealer came back with an offer, I just plugged the numbers in my phone and showed him that it wasn't going to work out. This was very useful for the negotiation process.


So there you have it. My top tips for buying a new bike hauler. Drive safe and honk if you ride bikes.

Saturday, February 19, 2011

Killed a Niner (again)

Two years ago, I bought my first Niner bike. I was very stoked with this purchase. At 6'5" tall, this was the first bike that felt like it really fit. Four months after receiving the bike from Colorado Cyclist, I had to warranty the rear triangle on it due to a frame failure. Niner stood behind their product and warrantied the frame right away. I'm sad to report that today I found another frame failure on the bike. Again, it's the rear triangle, but a completely different problem.


I was surprised by both the location and the severity of this crack. I didn't expect this location to be such a significant stress point. You can see some scuffing on the edges where the chain slaps against the frame on bumpy trails. Here's a modified shot from Niner's website showing where the crack is located on the frame.


Aside from the headaches dealing with the frame failures, I have to say I love this bike. I ride it about 3 days a week year round, so it gets lots of use. I still wish it had another 1/4" - 1/2" of BB clearance, but I have no further complaints after two years on this bike.

I'll contact Niner on Monday and see what they say about the replacing the rear triangle (again). I'll post when I hear back from them.

Sunday, April 11, 2010

Reach and Stack of a Santa Cruz V-10

It's impossible to judge precise bike fit using measurements only. You'll never know how the bike fits until you get on it. This is especially true for downhill bikes. These bikes are intended to have a very small fit so you can let the bike react to the rough terrain while you float over the bike. Recently, a new measurement pair has come along that promises to help this problem - Reach and Stack.

In essence, these new measurements draw a right triangle using only the center of the bottom bracket and the center of the top of the head tube. The idea is a wonderfully simple one. Your feet are attached to the pedals and your hands are attached to the handlebars. Regardless of whether you are standing up bombing down a downhill run or seated grinding out gears in a cross country race, you're always attached to the handlebars and pedals.

2010 has seen a significant increase in the number of manufacturers publishing Reach and Stack data for their bikes. Santa Cruz is not one of them, though. I own a Large Santa Cruz V-10 and thought I'd measure and publish the Reach and Stack for my bike.

The bike is running 26" wheels front and rear, Maxxis Minion tires front and rear. The front fork is a Fox 40 with a Fox drop upper crown (because the head tube length + FSA PIG DH Pro headset stack height is too tall for the stock flat upper crown).


To start with, I used a four foot level to ensure that the tires' contact points on the ground were perfectly level.


Then I setup a self-leveling, cross-hair laser level aligned to the center of the bottom bracket and center of the upper head tube openning.


I measured the Reach to be a little under 16 inches and the Stack to be a little under 24 inches.

For a bike that touted to be one of the largest downhill bikes on the market, I was very surprised at how small the bike measured. It does confirm how cramped I feel on this bike. It also gives me a useful measurement with which to compare different bike frames.

Cleaning Anodized Frames

Both my downhill and cross country bikes are black anodized aluminum frames. When it comes to cleaning them, I long for a clear coated painted bike. Nothing shines when clean like paint. The process of anodizing aluminum is dipping the bare metal frame in acid and letting the acid etch the top layer of metal. During that process, the color of the acid is impregnated in a very thin, very hard upper layer of the metal. It's resistant to scratches and holds up very well over time. However, there's never a "showroom shine" thanks to all those little pits etched into the metal.

Since the top layer of metal isn't smooth, when oily, slick, wet clay coats the frame, the pores in the metal are filled. Washing the bike off with a soft brush, rag or sponge doesn't dig deep and pull out that crud. The bike looks great when wet, but once dry, you can see the mud splatter design in the anodized aluminium.


I did some research and tried some new products this weekend to help spruce up the apperance of my bikes. The first product is Tutle Wax ICE Car Wash - a new "2-n-1" pH balanced car wash. Having a pH balanced wash is important because if the wash is too acidic, it can fade the anodized paint over time. This wash foams up very well and cut through the grime on my bikes without a problem.


However, once dry, the bikes still looked splotchy. So after drying the frame, I tried Tutle Wax ICE Liquid Polish. This is a new, gentler, silicone-based wax. It comes with a foam applicator and a microfiber towel. I made sure the frame was dry before applying the wax. It went on very easy - it's a clear liquid that's maybe a hair thicker than water. I wiped it on generously making sure to catch any runs or drips. I waited 5-10 minutes and used the supplied microfiber towel to wipe down the whole frame. It looks great! I've had the bike for over nine months and now the bike finally looks clean.


Not only does it look clean, but it should be easier to wash the bike next time since the frame is covered in a wax. Oh, the wax is a UV protectant, so that will help keep the anodized color from fading.


Two thumbs up!

Update on Things

It has been a while since my last update. I thought I'd take a few minutes to post a Winter 2009/2010 update.

Injury

On 16Nov2009, I managed to sustain a serious injury while biking on a paved greenway. I was coming in way too hot on a hard left-hand turn. The back end washed out and I crashed. I instinctively put my left foot out to try and catch myself, but I was moving too fast. About the only thing I remember from the crash was seeing my left foot up by my left elbow. Ouch! That's what snapped my MCL. The PCL snapped when my upper tibia slammed into the ground as first point of contact.

The orthopedic surgeon decided to let things heal on their own and see how things felt after two months rest and two months of physical therapy. I'm coming up on five months post-injury and things are looking very well. My knee joint is still weak and aches at some point every day, but I'm stable and I have no problem riding as hard as I want.

Cross Country

I'm still enjoying the Niner RIP9. I rode it about 3-4 times a week all Summer and the first part of Fall. The Niner has been the workhorse of my rehab from my knee injury. The first post-injury ride was 01Jan2010. I stuck to gravel roads for two months. On 01Mar2010, I ventured back on single track. I've been on the bike 3-4 times a week since then. Ah how I've missed single track.

Downhill

2009 saw an unprecedented four trips to Snowshoe, WV. The first trip of 2009 was with the Big Hit. The last three trips were on the v-10. When I last blogged about the v-10, I mentioned that I was disappointed with the Reach of the bike. I had done a ton of research and found that the v-10 was about the biggest DH bike they make (without getting a custom frame).

I'm still disappointed and feel a bit out of control on the bike. For someone 6'3" or less, I think it's an amazing bike. The rear travel is endless and super plush. I love bombing down the mountain on that bike. However, as the speed ramps up I begin to lose control. It's like I'm falling off the back of the bike. I've got some thoughts on this and will save them for a later post. Let's just say that I really wish the bike fit me better.

So that brings you up to date with me. Other than the injury, it's just more of the same.

Tuesday, September 8, 2009

New Kid In Town: V-10

As I mentioned in a previous post, I have a new downhill bike. I wanted a bike that fit a bit better (longer reach) than the Big Hit. As is usually the case, there wasn't a bike available to me to test ride, so I had to surf the forums and compare manufacturer's stats to pick the new bike. The winner is...a Santa Cruz V-10.

Those are very expensive so I had to browse the used market until I found one that was a few years old but didn't look abused. I found a 2007 V-10 that appeared to fit the bill. After some lengthy email exchanges, I was the proud owner of my very own V-10. Here's what it looked like when I built it up after it arrived from its previous owner in New York.


There were a few problems with the bike that needed to be addressed right away. It needed new cranks, a new rear derailleur, new wheels, a new rear shock and the fork was leaking oil. Some of that was known at purchase time, others were surprises after the fact. Oh well, that's to be expected when you can't test ride it before buying.

I called Fox and got some new seals and an extra firm spring for the Fox 40. I completely dismantled the fork and installed the new spring and seals. Here's an exploded view of the fork just before reassembly.


After consulting PUSH Industries, I called Go-Ride and ordered a new 2010 Fox Van R shock. I had Go-Ride send it directly to PUSH for custom tuning. I also picked up a new SRAM X.9 rear derailleur, Mavic 823 UST rims, and Maxxis Minion 26x2.5 UST tires.

On the used market, I grabbed a Truvativ Howitzer XR bottom bracket, Truvativ Holzfeller-OCT Crankset, Crank Brothers 50/50 XX pedals, and a Hadley 150x12 rear hub to match the Hadley front hub I already owned.

Today I picked up the rebuilt wheels from my trusted local mechanic/wheel builder and got the bike put together in its final state. Here are some beauty shots.


With the addition of the rebuilt wheels, I've now completed all upgrades planned for this bike. It took a couple of months to get to this point and I've taken it to Snowshoe twice already this year. The next trip is coming up in a few weeks.

With the bike fully built and running smoothly, the question remains, does it fit better than its predecessor? Well, it's about the same reach as before - maybe slightly less. However, there are some benefits to the new bike. Most significantly is the weight. The Big Hit was about 55-56 lbs. The V-10 is about 46 lbs. For the most part, weight isn't a big deal with a downhill bike. A heavier bike is more burly and, like me, has more mass for gravity to pull it down the mountain. Where I do notice the weight loss is when jumping the bike. This bike gets scary high. Way more air than I can handle right now. I'm still learning how to deal with that.

So, had I known then what I know now, would I have purchased the V-10? Probably not. It's an excellent bike, but I don't think I gained any reach with this purchase. I might have been better off had I held on to the Big Hit a little longer and purchased either an extra large 2010 EVIL Revolt or an extra large 2010 Turner DHR. However, since those frames alone cost almost as much as I have invested in the V-10, I'm not sure when I would have been able to afford one of those. I'm sure I'll post again when one of those frames arrives on my doorstep. Stay tuned. ;)